Last Updated on October 19, 2025 by Muhamed Elmesery
Have you ever wondered how physicists create free-body diagrams? What about economists or biologists? All of these professionals use specific symbols to chart the motion of an object.
The importance and virality of free-body diagrams (FBD) in physics are beyond description. Free-body diagrams emerged since Newton’s laws of motion stretched out to include many forms of dynamic and static motion. Such diagrams can vary in their level of simplicity. Some diagrams may be very simple, while others can be very sophisticated, need special treatment and undergo many steps.
A free-body diagram is a tool that is incredibly useful to visually chart the path an object will take under different circumstances. By understanding how external forces influence movement, you can improve your predictions and problem-solving skills.
We will start by defining what an FBD is and then explore some real-world examples. Finally, we will look at some tips for creating effective FBDs. After reading this blog, you should have a basic understanding of how to approach problems that require FBDs and be able to diagram simple motions accurately… Let’s take a closer look!
Check Praxilabs Virtual labs Plans
Table of Contents
Free-Body Diagram Definition
A free-body diagram is
“a graphical representation of the physical forces acting on an object.”
This includes both external forces (gravity, friction, wind, etc.) and internal forces (muscles, tendons, etc.). FBDs are used by physicists to simplify complex problems and understand the underlying physics at work.
When creating an FBD, it is important to consider all of the forces that are acting on an object. This can be daunting, but some tricks can help. First, think about whether the object is in contact with anything else. These objects will experience forces due to friction or contact with other objects. Second, think about any fluids that the object may be interacting with. This could include air resistance or fluid drag. Finally, think about the object’s mass and the force of gravity. These are the internal forces that will be acting on the object.
Purpose of Free-Body Diagram
Physical contact between objects, while non-contact forces can act on an object without any physical contact. The most common type of contact force is friction, which arises when two surfaces rub against each other. Other examples of contact forces include tension (the force exerted by a rope or string), the normal force (the force exerted by a surface on an object), and air resistance (the force exerted by the air on an object).
Non-contact forces, on the other hand, do not require physical contact between objects. The most common type of non-contact force is gravity, which attracts objects towards the center of the Earth. Other examples of non-contact forces include magnetic and electrostatic forces. Once all external forces acting on the object have been identified, they can be represented using arrows on the FBD. The direction of each arrow should correspond to the direction in which the force is acting, and the length of the arrow should be proportional to the magnitude of the force.
In addition to external forces, FBDs also include information about the object itself, such as its mass and velocity. This information is generally conveyed through text or symbols placed near the object on the diagram. Free-body diagrams are a powerful tool for understanding the motion of objects. They allow us to see all of the forces acting on an object and to visualize how these forces affect its motion.
Once you have considered all of the forces that are acting on an object, you can begin to create your FBD. The first step is to sketch the object in question. This should be a simple representation of the object, including all relevant dimensions. Next, you will need to add arrows to represent the direction and magnitude of each force. The length of the arrow should be proportional to the strength of the force. Finally, label each force accordingly.
Try Praxilabs’ Virtual Physics Lab to test Free-Body simulations
Create a Free Account To Our Free Virtual Experiments
Free-Body Diagram Examples
Now that we have covered the basics of free-body diagrams, let’s look at some real-world examples.
Example 1: A Book on a Table
Let’s say you have a book on a table. The book is not moving, so we know that the net force acting on the book must be zero. This means that the sum of all the forces acting on the book must be zero. In this case, only two forces are acting on the book: gravity and the force exerted by the table. We can represent this with the following free-body diagram.
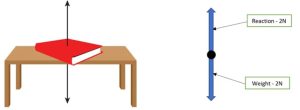
As you can see, the arrows representing gravity and the force exerted by the table cancel each other out. This is because they are pointing in opposite directions and have equal magnitudes. We can also see that the magnitude of these forces is equal to the weight of the book.
Example 2: A Car Accelerating Down a Road
Now, let’s look at a more complicated example. Consider a car that is driving down a road. The car has a mass of 1000 kg and is accelerating at 2 m/s2. We can represent this with the following free-body diagram.

As you can see, the car is being acted upon by four forces: gravity, friction, the force exerted by the road, and the force exerted by the engine. The force exerted by the road is pointing in the same direction as the motion of the car, so we know it is responsible for acceleration. The other three forces are all pointing in directions opposite to that of motion and are thus slowing down the car.
How to Draw an Effective Free-Body Diagram?
Now, let’s look at some tips for creating effective free-body diagrams.
- Keep it Simple
Free-body diagrams can quickly become cluttered and confusing. When creating an FBD, only include the forces that are relevant to the problem at hand. This will make your diagram much easier to interpret. - Use Appropriate Units
When labeling your forces, be sure to use appropriate units. This will help you keep track of the magnitudes of the forces and make sure they are consistent with one another. - Pay Attention to Direction
The direction of the forces is just as important as the magnitude. Be sure to include arrows in your diagram to indicate the direction of each force. - Label Your Forces
It is important to label each force in your diagram. This will help you keep track of the different forces acting on the object and make sure they are all accounted for. - Check Your Work
Once you have created your free-body diagram, take a step back and check your work. Make sure that all of the forces are accounted for and that they are labeled correctly. This will help you avoid making mistakes when solving problems.
Free-Body Diagram Problems and Solutions
Now that we have covered the basics of free-body diagrams, let’s put what we’ve learned into practice with some problems.
Problem 1
A car is driving down a road. The car has a mass of 1000 kg and is accelerating at 2 m/s2. Four forces are acting on the car: gravity, the force exerted by the road, friction, and the force exerted by the engine. What is the magnitude of each force?
Solution
First, let’s create a free-body diagram of the situation.
As we can see, four forces are acting on the car. We know that the car has a mass of 1000 kg and is accelerating at 2 m/s2. This means that the sum of the forces must be equal to the mass of the car times the acceleration.
Now, let’s label each force and write down the equations we need to solve for each one:
- Gravity
Fg = m*g
- Force exerted by the road
Fr = m*a
- Friction
Ff = µN
- Force exerted by the engine
Fe = m*a
where
- m: the mass of the car.
- g: the acceleration due to gravity.
- a: the acceleration.
- µ: the coefficient of friction.
- N: the normal force.
To solve for these forces, we will need to know the values of m, a, µ, and N. We are given m and a, but we will need to calculate µ and N. The coefficient of friction can be found using the following equation:
µ = Ff/N
Here, we need to calculate the value of N.
The normal force is equal to the sum of the forces acting on an object perpendicular to the surface it is in contact with. In this case, the only force acting perpendicular to the road is gravity. This means that the normal force is equal to the weight of the car. We can calculate the weight of the car using the following equation:
W = m*g
Since we have all the needed information, we can solve for the forces as follows:
- Gravity
Fg = m*g = (1000 kg)(9.81 m/s2) = 9810 N
- Force exerted by the road
Fr = m*a = (1000 kg)(2 m/s2) = 2000 N
- Friction
Ff = µN = (0.5)(9810 N) = 4905 N
- Force exerted by the engine
Fe = m*a = (1000 kg)(2 m/s2) = 2000 N
Problem 2
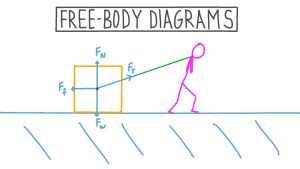
A box is being pulled across the floor by a rope. The box has a mass of 4 kg and is being pulled with a force of 10 N. The coefficient of friction between the box and the floor is 0.4. What is the acceleration of the box?
Solution
First, let’s create a free-body diagram of the situation.
As we can see, two forces are acting on the box: the force exerted by the rope and friction. We know that the box has a mass of 4 kg and is being pulled with a force of 10 N. This means that the sum of the forces must be equal to the mass of the box times the acceleration.
Now, let’s label each force and write down the equations we need to solve for each one.
- Force exerted by the rope
Fr = m*a
- Friction
Ff = µN
To solve for these forces, we will need to know the values of m, a, µ, and N. We are given m and Fr, but we will need to calculate µ, N, and a. In this example, we are given the value of µ, and we still need to calculate the values of N and a.
The normal force is equal to the sum of the forces acting on an object perpendicular to the surface it is in contact with. In this case, the only force acting perpendicular to the floor is gravity. This means that the normal force is equal to the weight of the box. We can calculate the weight of the box using the following equation:
W = m*g
Now that we have all of the information we need, we can solve for the forces.
- Force exerted by the rope
Fr = m*a = (4 kg)(10 N) = 40 N
- Friction
Ff = µN = (0.4)(40 N) = 16 N
As we can see, the two forces acting on the box are the force exerted by the rope and friction. The magnitude of each force is 40 N and 16 N respectively. Since the sum of the forces must be equal to the mass of the box times the acceleration, we can solve for a using the following equation:
a = (F)/(m)
where
- F: the sum of the forces, and
- m: the mass of the box.
– Acceleration of the box is given by
a = (40 N + 16 N)/(4 kg) = 12 m/s2
Advantages of Free-Body Diagrams
There are many advantages to using free-body diagrams, including:
- They can be used to simplify complex real-world scenarios.
- They can be used to predict how an object will move under given circumstances.
- They can be used to identify all of the external forces acting on an object.
- They can be used to determine the net force acting on an object.
The net force is the vector sum of all of the external forces acting on an object. It is represented by the arrow in the free-body diagram. The direction of the arrow indicates the direction of the net force, and the length of the arrow indicates the magnitude, or strength, of the net force.
FBDs can be used to solve problems involving both linear and rotational motion. In addition, they can be used to analyze static situations in which an object is not moving. Free-body diagrams are a valuable tool for engineers and physicists, as they can be used to simplify complex problems and to understand the underlying principles of motion.
In summary, free-body diagrams are powerful tools that can be used to solve problems and to understand complex systems. The 3D virtual labs of PraxiLabs now offer you the opportunity to try out its free-body diagram experiments for free. Don’t hesitate!